Local SSL certificate
Introduction
Most people don’t need this guide. Apps open at your Hub’s address and the app’s port (for example http://192.168.1.20:8080), and localhost addresses need no certificate. This guide is for the advanced case where you give your apps in Public Web mode an internal name on your local network, such as app.ci.lan. Your browser shows a certificate warning for that name until it trusts the certificate that Traefik presents. The guide covers the two halves of that setup: trusting a certificate on your devices, and making the name resolve to your Hub.
Current builds don’t generate a local certificate for you. The Download
certificate button in the dashboard settings downloads
<ROOT_FOLDER_HOST>/traefik/tls/cert.pem, and Hub no longer creates that
file — Traefik’s folder now lives under state/traefik/ — so the download
comes back empty. Use a certificate that you generate or already own, and
import that file in the steps below wherever the guide says to download one.
The name you set as your local domain is the domain part of these names. Set one explicitly — the default (localhost) does not need a certificate, since browsers already treat it as a secure context. Hub builds an internal hostname from your local domain for each app that uses the Public Web exposure mode. It doesn’t create a local-domain name for apps in other modes; reach those at the Hub’s address and the app’s port.
Set your local domain in the dashboard settings page (the field is read-only until you turn on Advanced settings there), or as localDomain in your settings.json file. See Custom Settings and Finding Your App’s URL.
This guide uses ci.lan as the example local domain — substitute whatever you configured.
Two things have to be true before https://ci.lan works: your device trusts the Hub’s certificate, and the name resolves to the Hub. The rest of this guide covers each half.
flowchart LR
    subgraph T["Trust the certificate"]
        G["You generate or supply a<br/>certificate for ci.lan"] --> DL["Export the certificate<br/>file"]
        DL --> TS["Import into the OS trust store"]
    end
    subgraph N["Resolve the name"]
        DNS["Pi-hole or AdGuard Home<br/>rewrites ci.lan and *.ci.lan"] --> IP["Hub's LAN IP"]
        H["hosts file entry<br/>on each device"] --> IP
    end
    TS --> OK["https://ci.lan and https://app.ci.lan<br/>open over a trusted connection"]
    IP --> OK
Trusting the certificate
To be able to use the certificate, you need to trust it. This is done by adding the certificate to your operating system’s trust store.
First you need the certificate file. Use the certificate you generated or supplied. The Download certificate button in the dashboard settings (below the Local domain input field) is meant to export the Hub’s own certificate, but see the warning at the top of this page.
Windows
- Open the
Startmenu and typecertmgr.mscand pressEnter. - In the left pane, click
Trusted Root Certification Authorities. - In the right pane, click
Certificates. - On the
Actionmenu, point toAll Tasks, and then clickImport. - Follow the instructions in the
Certificate Import Wizardto import the certificate.
macOS
- Open the
Keychain Accessapp. - Click
File>Import Items. - Select the certificate file and click
Open. - Double-click the certificate file.
- Expand the
Trustsection. - Change the
When using this certificateoption toAlways Trust.
Linux
- Copy the certificate file to
/usr/local/share/ca-certificates/. - Run
sudo update-ca-certificates.
DNS resolution
To be able to access your dashboard and apps using the local domain, you need to make sure that the domain resolves to the IP address of your Companion Hub server.
The most reliable way to do this is by running a DNS server on your network and adding the domain to it. You can use Pi-hole or AdGuard Home for this. Both are available as apps in the Companion Hub App store.
| Resolution method | DNS server on your network | hosts file on each device |
|---|---|---|
| Covers every device on the LAN at once | ✓ | – |
| One wildcard entry (*.ci.lan) covers all apps | ✓ | One line per domain |
| Needs extra software | Pi-hole or AdGuard Home from the App store | – |
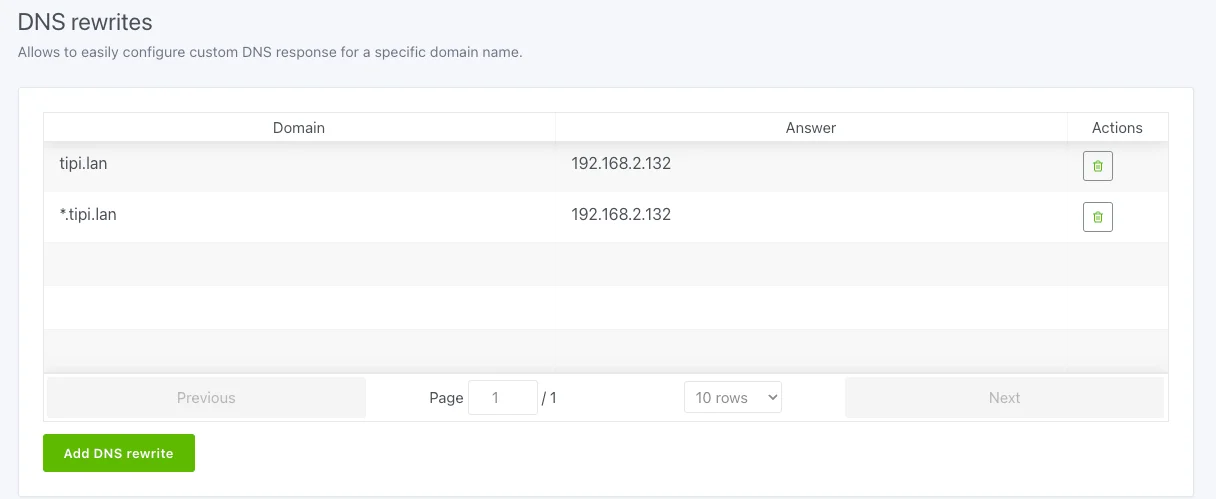
For example using AdGuard Home you can add the domain to the DNS rewrites section of the app.
Don’t forget to add the wildcard domain *.ci.lan to the DNS rewrites
section in order to be able to access your apps as well.
If you don’t have a DNS server running on your network, you can add the domain to the hosts file on your computer.
By using this method you need to do this on every device you want to access
your dashboard and apps from and for every domain you want to use. (e.g.
ci.lan, app1.ci.lan, app2.ci.lan)
Windows
- Open the
Startmenu and typeNotepadand pressEnter. - Click
File>Open. - Navigate to
C:\Windows\System32\drivers\etc. - Change the file filter to
All Files (*.*). - Select
hostsand clickOpen. - Add the following line to the end of the file:
<ip-address> <domain>. - Save the file.
macOS / Linux
- Open the
Terminalapp. - Run
sudo nano /etc/hosts. - Add the following line to the end of the file:
<ip-address> <domain>. - Press
Ctrl + Xto exit. - Press
Yto save the file. - Press
Enterto confirm the file name.